
Recently I have found many photographers in the club and beyond who are not making use of the higher ISO capability of modern cameras. So stop getting blurred photos, start using higher ISO values and faster shutter speed.
I’m going to be controversial, and say that there’s only two kinds of photos; blurred and sharp
For my work, I need to see details in some part of the frame, that means I need sharpness. Sharpness is the result of four essentials
- accurate focus
- camera not moving while the shutter is open
- subject not moving while the shutter is open
- good quality lenses
Accurate focus
Accurate focus is down to you, or your camera. Learn to use the focus system, read the instruction book, so that you can choose exactly where in the frame you want the focus point to be.
900 million AF points may be a great specification, but you only need one point to be sharply in focus. If you let the camera decide which AF point to use for you, it will always take the easy option and focus on the closest subject that is easiest to focus on. That frequently means the blade of grass fifteen feet in front of your once in a lifetime subject.
Camera not moving
To stop a camera moving, put it on a solid tripod, and use a remote release so that pressing the shutter is not adding movement. However as lovely as this is, it isn’t always practical. Then you need to do your best, image stabilisers – in the camera, or the lens – may help.
Basic rule for handholding the camera is 1/focal length of your lens.
This is an old rule, from the days of film cameras when all were full-frame. Digital cameras with their smaller APS-C, micro 4/3rds and other sensor sizes need to modify the rule a little.
If your camera is an APS-C crop camera, then work on at least 1/ 1.5 x focal length
If you have a micro 4/3rds camera, then work on at least 1/ 2x focal length
If you have a zoom lens, it’s safest to calculate with the longest length. So a 100-300mm lens is calculated as 1/300s on full-frame, 1/450s on APS-C and 1/600s on micro 4/3rds.
Avoid being lulled in to a safe sense of security by a 4-stop stabiliser with your 500mm lens. A 500mm lens should be used with a 1/500s or faster shutter speed. Four stops less than this is 1/500s… 1/250s… 1/125s… 1/60s… 1/30s. It’s witchcraft I’m sure.
However no clever tech or camera can stabilise a moving subject, only shutter speed can do that.
Subject not moving
Subjects; every picture needs one, but they are frequently prone to moving, sometimes more than you think, or would hope for.
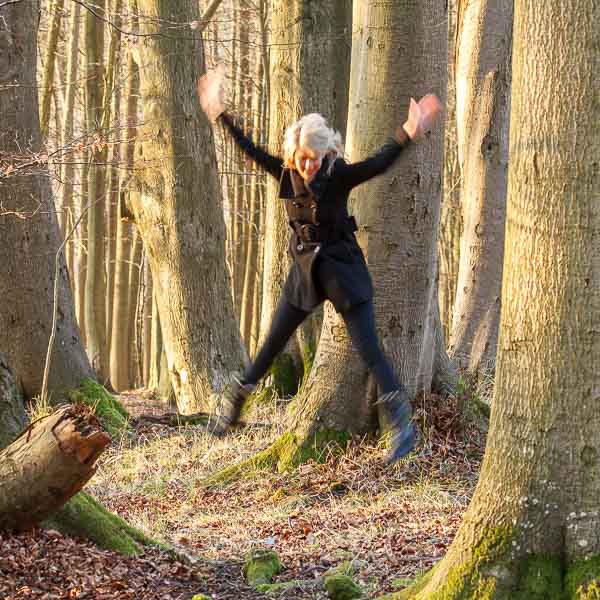
Take a look at this example photo that was taken with a stabilised 70mm lens. The camera was handheld and the shutter speed was 1/25s. You’ll notice all the trees are nicely sharp – because they are stationary, so can be stabilised by the clever lens tech. However the person doing the star jump is moving and cannot be stabilised by your clever camera or lens tech. The only way to freeze a moving subject like this would be a much faster shutter speed.
Good quality lenses
That includes most of the modern ones you can buy. Make sure to keep them clean, and if they get dropped, knocked or similar then it’s worth having them checked out for mis-alignment of the lens elements inside.
If the lens has a stabiliser in it, or the camera, then it’s actually best to switch it off if you are going to use it on a tripod. Sorry if that means another tour of the instruction book!
Enough ISO
How do you get a faster shutter speed? Use a higher ISO value.
Please stop avoiding high ISO if your most prized photos are not sharp enough. Far too many times recently I have seen photos that are just not sharp enough, and it’s almost always due to shutter speed. You can raise the shutter speed by increasing the light or making the camera more sensitive to light by raising the ISO.
A day at the zoo, including a walk through the reptile house.

I noticed this green chameleon and decided to photograph it. The light wasn’t great, but the chameleon was stationary. So with the 70-200mm image stabilised zoom at 200mm I took this photo through a pane of glass, handheld at 1/200s f/5.6 ISO 1600. Looking back I should have gone for f/8 to get more than just the eye of the chameleon sharp, so that would have meant ISO 3200.

Speaking of the eye of the chameleon, this is it at 100% 1:1. It’s sharp enough for me, but no surprises it has some noise visible. Though no judge is ever going to see this little of the photo.
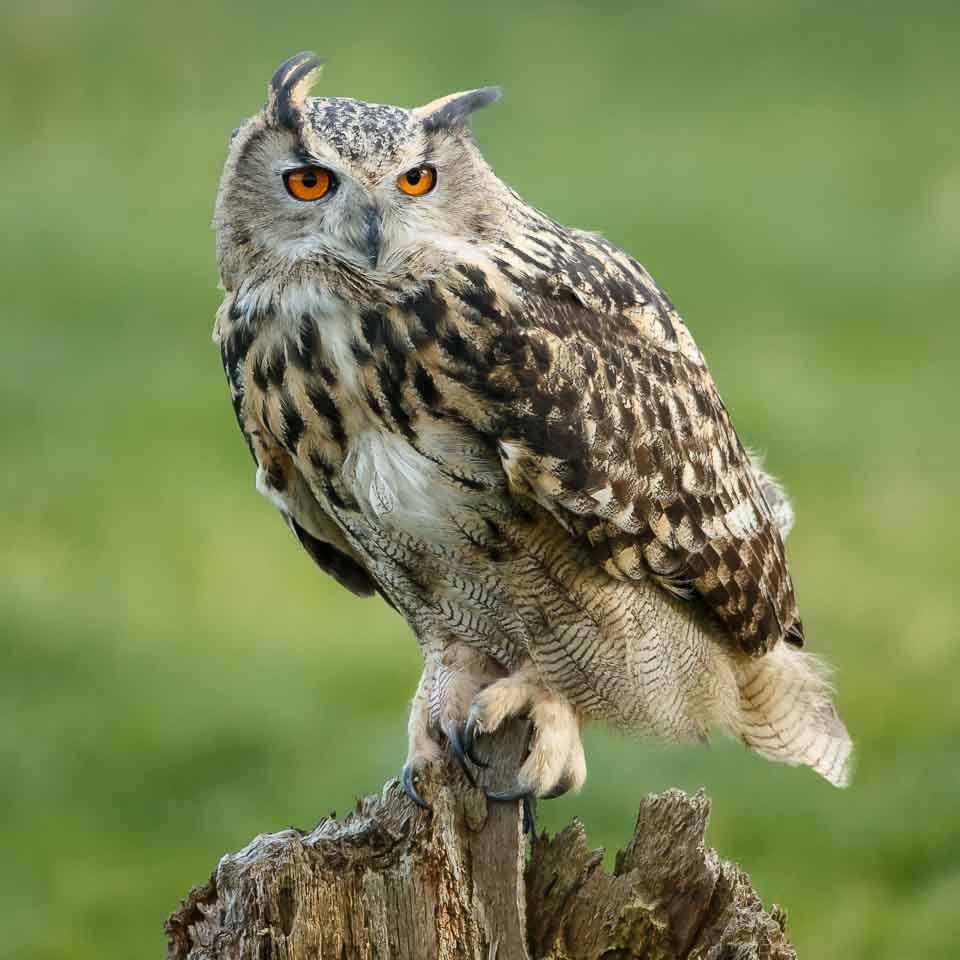
That owl at the top of the page was photographed outside on a blustery day. You can see the wind pushing the feathers over to the right of the frame. It was captured with a big, heavy lens with a focal length of 560mm. This required a fast shutter speed, 1/560s as a minimum, but with the wind also blowing the lens about, I used 1/1600s shutter speed. Wide-open at f/5.6 that meant using ISO 3200 in reasonable daylight!
So if I zoom in to 100% and take a crop around the eye, you can see it’s not perfect, though it is sharp.

Now think that the crop is 600 pixels square, there’s so many more pixels in the full image it needs to be reduced in resolution for a projected image competition. If you treat the photos well the judge can’t tell.
Processing photos captured with higher ISO
You camera likely has noise reduction, if you only shoot JPEG images (mostly) then turn the noise reduction to the standard setting.
If you shoot RAW, then learn the steps to deal with the noise in your software. I use Lightroom, same as ACR in Photoshop, and the detail panel is where it all happens.

I’ll firstly increase the masking value, while holding down the <ALT> key. This shows me in black and white where the sharpening will be applied. White is sharpened, black is not. I don’t want to sharpen the out of focus parts of my shots as it sharpens the noise too.
Then I increase the amount and set a radius of about 1.2 to 1.3. It helps to zoom in to 1:1 for these last two steps. Press Z on the keyboard to zoom in and out.
Then while zoomed in I will look at the luminance noise reduction, and move it up to reduce the noise. It’s a matter of taste and depends on your camera and ISO speed. Move the slider to 100% and see how blurred / smooth / detail lacking the image is. Then back it off to a value that looks about right to you. If your image is from your 20 million pixel camera and is in for a projected competition you can use less noise reduction.
Hope that you find this a little bit helpful in the quest for sharp shots… or maybe you like blurred pictures 😉 ?
One of the best articles I have seen on sharpness.
I am a complete Novice in photography. Found this article illuminating. Now know, where I been doing it all wrong. Thank you.
Great explanation AND valuable guidance on Lightroom processing. Cheers. DRA
Thanks for this article it came in a time where I am feeling like messing up things. I recently got a 35mm f1.8 on my D5300 but am struggling with focusing I usually shoot at f1.8 and ISO 100 plus shutter at 1/160 can these factors cause the focusing issues or it’s on my camera? I shoot portrait mainly but I am fed up of burry images please help me.